Volumes
Volumes are block storage devices that you can attach to instances to enable persistent storage. It’s possible to attach a volume to a running instance or detach a volume and attach it to another instance at any time. You can also create a snapshot of a volume and it could be used later to boot an instance.
You should have in mind that the volumen of storage is given by the quota of your project. If you try to add a volumen larger than your quota the process will crash.
Create and attach a volume
Additional volumes are useful to add more storage space to the MV. They are independent from the root/main disk. You must create and add the volume from Horizon and then, mount it via command line accessing by SSH.
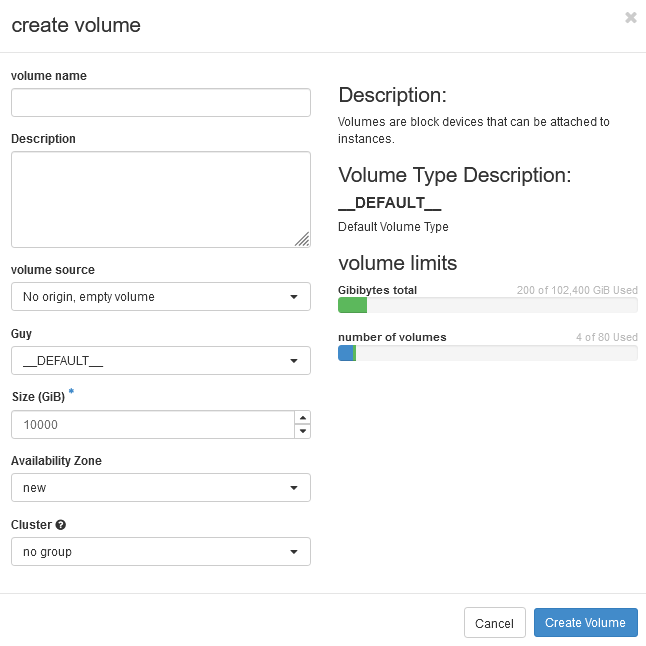
Navigate to Volumes on the left panel and click on Create volume.
Name the volume and select its size (GB). The other options should be keep as default unless you need any special requirement.
After creating the volume you will be taken back to the volume’s list page. The status column will read Available if the volume is ready to be used.
To add the volumen to your instance, navigate to the Instance’s menu, select the VM, open the settings tab, click on Add volume and add the volume you have created.
If you add any volume to your VM you must mount it in the VM’s otherwise you won’t be able to use it. The steps to mount a directory are:
$ root@yourMVsname:/home/cesgaxuser# lsblk
NAME    MAJ:MIN RM  SIZE RO TYPE MOUNTPOINTS
loop0     7:0    0 63.2M  1 loop /snap/core20/1695
loop1     7:1    0  103M  1 loop /snap/lxd/23541
loop2     7:2    0 49.6M  1 loop /snap/snapd/17883
vda     252:0    0   40G  0 disk
├─vda1  252:1    0 39.9G  0 part /
├─vda14 252:14   0    4M  0 part
└─vda15 252:15   0  106M  0 part /boot/efi
vdb     252:16   0  160G  0 disk

$ root@yourMVsname:/home/cesgaxuser# mkfs.xfs -L volumesname /dev/vdb
meta-data=/dev/vdb               isize=512    agcount=4, agsize=10485760 blks
         =                       sectsz=512   attr=2, projid32bit=1
         =                       crc=1        finobt=1, sparse=1, rmapbt=0
         =                       reflink=1    bigtime=0 inobtcount=0
data     =                       bsize=4096   blocks=41943040, imaxpct=25
         =                       sunit=0      swidth=0 blks
naming   =version 2              bsize=4096   ascii-ci=0, ftype=1
log      =internal log           bsize=4096   blocks=20480, version=2
         =                       sectsz=512   sunit=0 blks, lazy-count=1
realtime =none                   extsz=4096   blocks=0, rtextents=0

$ root@yourMVsname:/home/cesgaxuser# mkdir /data

ADD THE FOLLOWING LINE TO THE /etc/fstab:
LABEL=volumesname       /data   xfs     defaults        0 0

$ root@yourMVsname:/home/cesgaxuser# vim /etc/fstab L

$ root@yourMVsname:/home/cesgaxuser# mount /data

$ root@yourMVsname:/home/cesgaxuser# df -h
Filesystem      Size  Used Avail Use% Mounted on
tmpfs           795M  1.1M  794M   1% /run
/dev/vda1        39G  1.9G   37G   5% /
tmpfs           3.9G     0  3.9G   0% /dev/shm
tmpfs           5.0M     0  5.0M   0% /run/lock
/dev/vda15      105M  5.3M  100M   5% /boot/efi
tmpfs           795M  4.0K  795M   1% /run/user/1001
/dev/vdb        160G  1.2G  159G   1% /data
Note
If you have your SSH keys and your security groups set, you can now deploy your VM.
Snapshots
You can create new images from running instances. This is useful to save the state of the VM. The procedure should be performed as follows:
Detach the volume from the instance before you take the snapshot. Creating a snapshot from an attached volume can result in a corrupted snapshot.
Navigate through Volumes.
Select the volume to add to an instance and click on More > Create Snapshot.
Enter a name for the snapshot and click Create Volume Snapshot. It will appear at Volume Snapshots tab.